Affiliate disclosure: This article contains Amazon affiliate links. As an Amazon Associate, Hashtek may earn from qualifying purchases at no extra cost to you.
A reliable garden starts with repeatable inputs. At Hashtek, repeatability is the whole game. You can't get consistent results downstream when the inputs upstream are all over the place. That's as true in the garden as it is in the lab.
And here's the thing: what good is having a hash lab if you can't feed it? A press, a washer, a freeze dryer, all of it is downstream of one question, where does the material come from. The best solventless starts with the best flower, and the best flower starts in your own beds where you control every input. That's the whole point of this post. Grow your own, feed your own process, and share the tek so everyone can do it better.
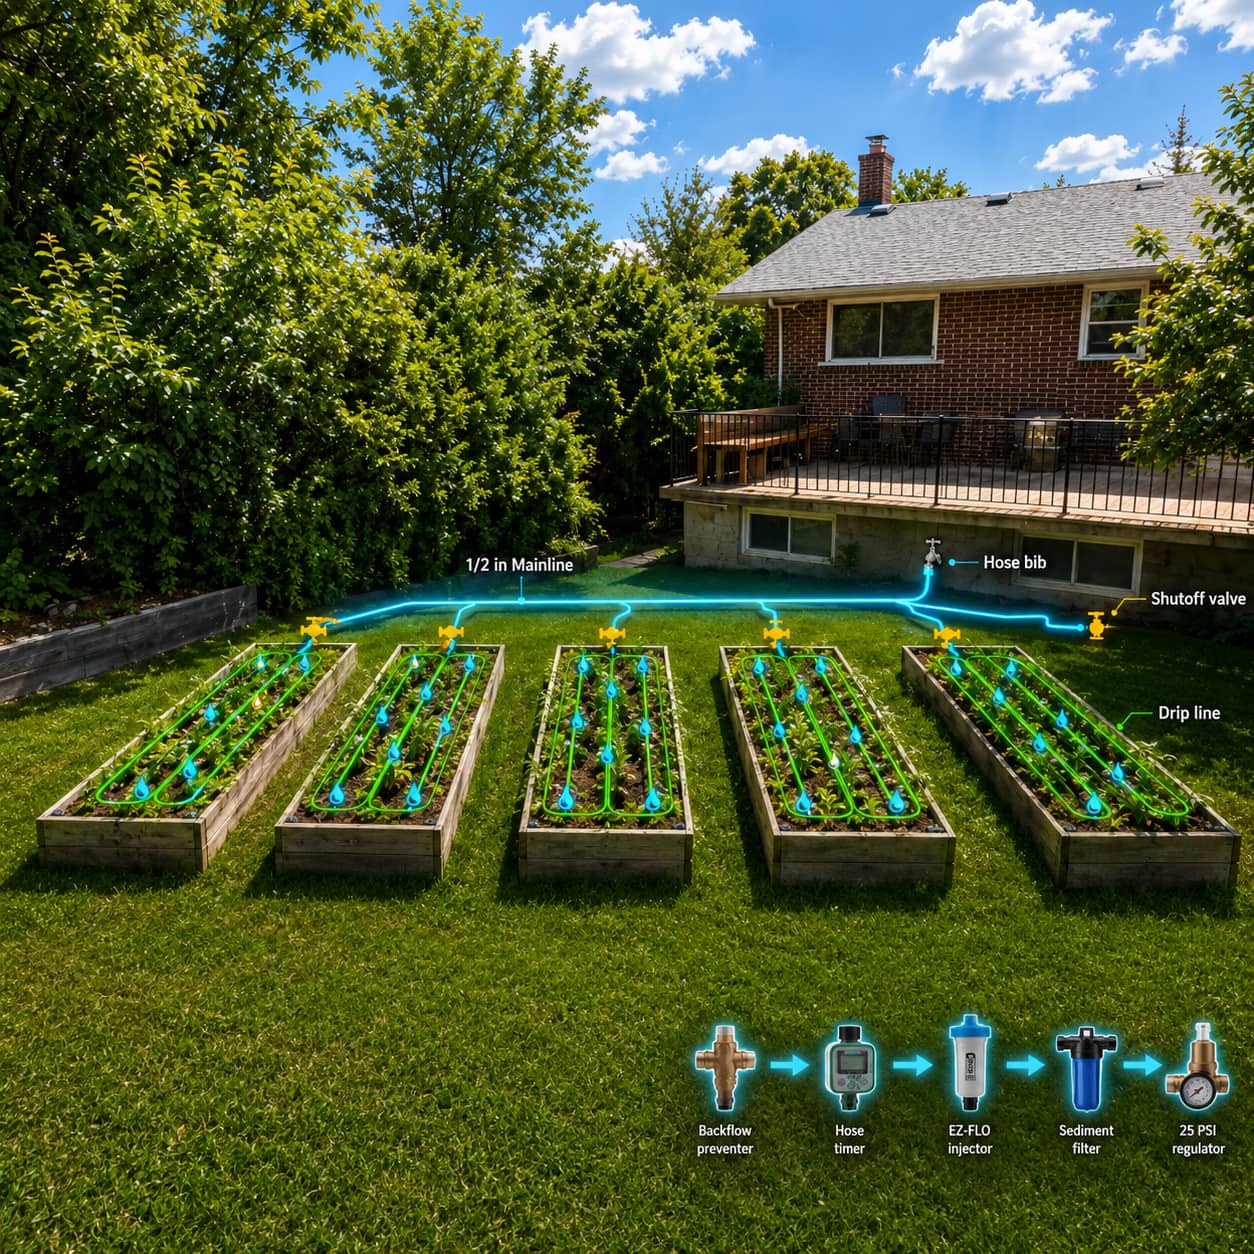
DripperTek is our raised-bed drip and fertigation build: modular, repairable, automated, and built for clean feeding from day one. It replaces cracked soaker hose and turns watering into a set-and-forget system. This guide covers a four-bed layout but scales up or down.
Feed the garden. Feed the lab.
The One Rule: Keep It Clean
Small emitters clog when you run dirty inputs. That splits everything you own into two worlds:
- Drip world: clean, fully dissolved liquids only (soluble mineral salts, humic/fulvic, clean kelp).
- Hand world: anything thick, cloudy, or alive (fish, compost teas, microbial inoculants, ferments). Poured around the roots, never through the lines.
Test: if it leaves sediment in a jar, don't send it through a 2 GPH emitter. Keep those worlds separate and most drip problems never happen.
Shop the Build
Injector
- EZ-FLO 2020-HB 2.5-Gallon Fertilizer Injector: adds fertigation to a hose-fed system; sits after the timer (on/off pressure, ~50 PSI).
- EZ-FLO 1010-HB Constant-Pressure Injector: optional upgrade if the injector must sit before the timer (stays pressurized, ~80 PSI).
Timer before injector, use the 2020-HB. Injector before timer, use the constant-pressure model.
Timer & mainline
- 3-Zone Hose Timer: opens the zone on schedule; the 2020-HB sits after it.
- 1/2-Inch Blank Poly Mainline Tubing: the backbone the whole system branches off.
Emitters & tubing
- Rain Bird SW20-30PK 2 GPH Pressure-Compensating Emitters, 30-Pack: work directly with 1/4-inch tubing (no odd microtube sizes). PC across 15–50 PSI. Two per plant.
- Pawfly 200 ft 1/4-Inch Distribution Tubing: carries water from emitter to root zone.
Pressure, filtration, safety
- Senninger 25 PSI Pressure Regulator: drops hose pressure into the drip window, and curbs drain-back.
- STYDDI 100-Mesh Garden Hose Filter: protects emitters. Step up to 120–150 mesh if you fertigate often.
- Raindrip R620CT Anti-Siphon Backflow Preventer: required once you inject fertilizer. Mount close to the hose bib.
Distribution & fittings
- 1/2-Inch Barbed Shutoff Valves, 6 Pack: isolate each bed. Best cheap upgrade in the build.
- 1/2-Inch Mainline Fittings Kit: tees, elbows, couplers, ends. (Pairs with the 1/2-inch poly mainline above.)
- Gardrip 250-Piece 1/4-Inch Fittings Kit
- Pawfly 100-Piece Tubing Support Stakes: matter more than you'd think (see drain-back).
- QWORK Drip Irrigation Hole Punch Tool
Fertigation upgrades (new)
- Submersible / transfer pump: for batch feeding (below).
- EC / TDS meter: the real control on nutrient strength.
- Garden hose quick-connect fittings: swap the dripper line between timer and pump in seconds.
Plumbing Order
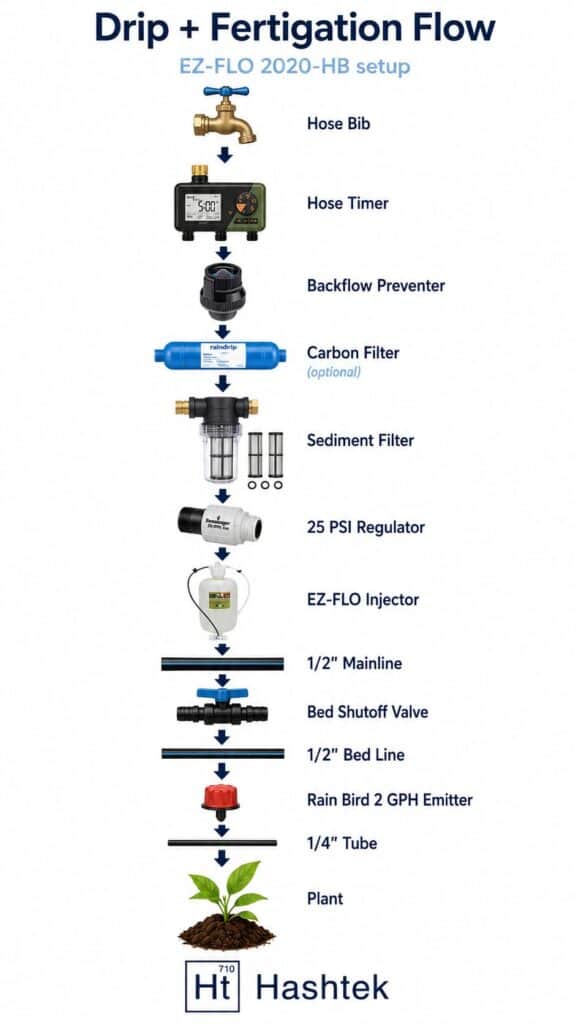
Standard EZ-FLO 2020-HB setup (recommended):
Hose bib, hose timer, backflow preventer, (optional carbon filter), sediment filter (120–150 mesh), 25 PSI regulator, EZ-FLO 2020-HB injector, 1/2-inch mainline, per-bed shutoff, bed line, Rain Bird emitters, 1/4-inch tube to plant, quick-disconnect.
Two rules drive this order, and they are not optional:
- The regulator goes before the injector. The 2020-HB tank is rated for ~50 PSI max. Unregulated house pressure can damage it and void the warranty, so pressure gets knocked down to ~25 PSI before it reaches the tank.
- The injector fitting is the last element in the head assembly. EZ-FLO's own instructions say to arrange the filter, regulator, and timer so the injector fitting comes last, right before the drip line. So the flow is filter, then regulator, then injector, then mainline.
Backflow placement is flexible as long as it sits upstream of the injection point (it does here). Close to the bib is also fine.
Constant-pressure injector (1010-HB) alternative: hose bib, backflow preventer, (optional pressure-rated carbon filter), EZ-FLO constant-pressure injector, timer, sediment filter, 25 PSI regulator, mainline. This unit is rated to ~80 PSI and is meant to sit before the timer/valves so it can feed multiple zones; the filter and regulator downstream protect the drip zone.
Four beds: run a 1/2-inch trunk, branch to each bed through its own shutoff. Inside each bed, run 1/2-inch line down the center, punch two emitters per plant, short 1/4-inch tube to each side of the root zone.
Emitters, Pressure & Drain-Back
After shutoff, lines can drain and emitters dribble. That's low-head siphoning. It wastes solution and, worse, parks nutrient in the emitter where biofilm starts. Three fixes:
- Point tube ends down and stake them at the root zone, working with gravity.
- Keep pressure in spec with the 25 PSI regulator (PC emitters only hit rated flow inside 15–50 PSI).
- Use anti-drain (CNL) emitters if you want it fully gone. A check valve holds lines full until ~7 PSI, so no drain-down between cycles. Worth it for short, frequent pulse feeding.
Elevation costs ~0.43 PSI per foot of rise, enough to make cheap emitters uneven across beds, which is why PC emitters matter.
The Two Ways to Feed
The quick-disconnect on your dripper line lets you run either one.
A) EZ-FLO injector (clean, automated, single-part). Draws concentrate at ~100:1 and blends on the fly. Perfect for one clean input: a single-part mineral feed, a zero-phosphate Cal-Mag on its own, or plain humic/kelp. The catch is that the tank sits at ~100x, which is a trap for anything with calcium (see the rule below).
B) Batch tank + submersible pump (complete, multi-part feeds). Mix a full batch in a large tank at final feed strength, then pump it straight into the dripper lines. No injector, no concentrate. This is the upgrade that matters: the precipitation problems only happen at concentrate strength, so a feed-strength batch lets you run a complete feed in one pass (base plus Cal-Mag plus silica) that would sludge solid inside an injector.
How the swap works: a garden-hose quick-disconnect on the end of the dripper line. Normally it's on the timer-fed line; to run a batch, pop it, drop the pump in the tank, connect, pump. Five seconds, no tools.
Batch rules: mix fresh and use it up the same day. Dissolve fully (grit clogs emitters). Run the pump through the 25 PSI regulator so you don't overshoot the emitters. Flush plain water after.
Nutrient Playbook
The master rule, calcium vs. phosphate. Heavy feeders want lots of calcium, but calcium and phosphate crash out as sludge when concentrated together. That's why growers run "A/B" and only let them meet at feed strength. Everything below follows from this.
- Base, Jack's Professional: 20-20-20 General Purpose for veg, 10-30-20 Blossom Booster for flower. Both are fully soluble and carry no calcium, so they share one injector tank fine. The gap they leave is Cal/Mag.
- Cal-Mag (zero-phosphate, e.g. 14-0-14): stable alone in the injector, but never in the same concentrate tank as the phosphate base. Run it three ways: mixed into the batch tank (one complete pass), alternating injector fills, or hand-applied. Cheap soil route: dry garden gypsum plus Epsom salt to the beds (skip plaster of Paris, it sets hard).
- Silica (potassium silicate, ~0-0-4): high pH, so it goes in the water first, alone, before anything else, or it crashes your Cal/Mag. About 0.5 mL/L, start light.
- Multi-part liquid line (GH 3-part): add Micro before Bloom (Micro carries calcium). Full order: water, silica, Micro, Grow, Bloom.
- Biology (microbial inoculant): mix in dechlorinated water, apply as a soil drench only, fresh, a couple times a season. Never the drip. Same for fish and ferments.
- The real control, your EC meter: every number here is a starting point. Measure at an emitter, subtract tap baseline. Targets around 0.8–1.2 (seedling), 1.2–1.8 (veg), 1.4–2.0 (flower) mS/cm. Living soil means run the lighter end, since you're supplementing, not feeding inert media.
Mixing order (tape to the tank): water, silica, Micro/Cal-Mag, base, phosphate part last, measure EC, feed, flush. Never: mix calcium and phosphate at concentrate. Run biology/ferments through emitters. Add silica late. Let a batch sit for days. Use bleach on the lines.
Watering Math
Two 2 GPH emitters give 4 GPH per plant. 15 min is about 1 gal, 30 min about 2 gal, 45 min about 3 gal. Four beds at four plants each (16) is 32 emitters, roughly 1.07 GPM.
Timing: short, frequent beats one long soak. Start around 2 cycles/day, 12–15 min each, morning and late afternoon; less for young plants. Verify with a test hole a few inches out, and judge by the root zone, not the surface.
Cleaning the Lines (Not Bleach)
A bad bleach flush leaves chloride at the roots and stresses plants, which is the source of the "tastes like chemicals" complaints. Use the right tool instead:
- Biofilm/slime: hydrogen peroxide (3% at about 1:10, dwell 20–30 min, flush; run it closer to 1:3 for heavy fouling). No residue, no taste risk.
- Mineral scale: citric acid, which dissolves the salt crust peroxide won't touch. Soak clogged emitters separately.
Routine: plain flush, peroxide dwell, (citric if scaled), then a heavy clean-water flush (the step people skip, then blame the taste). Prevention beats cleaning: flush 30 sec after every feed, keep biology out of the drip, run a 120–150 mesh filter, and never let solution sit stagnant.
First Startup
Plain water only. 1) Flush the mainline with ends open. 2) Punch emitters, run tubes, end in quick-disconnects. 3) Stake tube ends down. 4) Run 15–20 min and check every fitting and emitter. 5) Check moisture below the surface. 6) Calibrate fertigation last: prove water first, then learn your injector's real draw, then feed with the EC meter.
Winterize: drain the mainline, pull the timer, empty and store the injector, protect valves from freeze.
Final Thoughts
Soaker hose cracked, watered unevenly, and only delivered plain water. DripperTek is the opposite: automated, repairable, and built for clean fertigation. Feed the biology by hand and the minerals through the lines, run single-part on the injector or a complete batch through the pump, and let the EC meter have the final word.
But the real reason to build it is bigger than the beds. A hash lab is only as good as what you feed it, and the best material is the stuff you grew and dialed in yourself. Own the input, own the process. Grow your own, share the tek, and help the next grower do it cleaner than you did.
Feed the garden. Feed the lab.
Installation video coming soon.
Affiliate disclosure: This article contains Amazon affiliate links. As an Amazon Associate, Hashtek may earn from qualifying purchases at no extra cost to you.